


The xTool F1 Ultra stands out as the best tool for engraving wood. This laser engraver delivers precise results, easy operation, and impressive versatility. Safety features and competitive pricing help it appeal to both beginners and professionals. Market trends show strong demand for personalized, eco-friendly engravings. The global woodworking CNC tools market continues to grow, fueled by advances in automation, precision, and smart technologies.
Key Takeaways
- The Thunder Laser Bolt offers high precision and fast engraving, making it ideal for detailed wood projects and batch production.
- This tool supports many wood types and materials, including acrylic, leather, and glass with a rotary attachment, adding great versatility.
- Safety features like a protective lid, emergency stop, and tilt detection help beginners and professionals work confidently.
- Easy-to-use touchscreen controls and quick setup make the Thunder Laser Bolt accessible for users of all skill levels.
- Regular maintenance, such as cleaning optics and lubricating parts, keeps the machine running smoothly and extends its life.
- Choosing the right wood, preparing it well, and testing settings improve engraving quality and reduce mistakes.
- The Thunder Laser Bolt balances professional performance with a reasonable price, offering excellent value for hobbyists and small businesses.
- Understanding your project needs, budget, and workspace helps you select the best engraving tool and features for success.
Best Tool Overview
Top Pick
The Thunder Laser Bolt emerges as the best tool for engraving wood in 2024. This desktop laser engraver combines industrial-grade performance with user-friendly features, making it a top choice for both hobbyists and small business owners. Its 30W RF CO2 laser tube delivers stable power and superior beam quality, ensuring fine engraving details and smooth gradations. The Thunder Laser Bolt maintains high precision even at fast speeds, which sets it apart from other models in its class.
Features
| Engraver Model | Laser Power | Engraving Speed (mm/s) | Work Area (mm) | Notable Features and Performance Benchmarks |
|---|---|---|---|---|
| Thunder Laser Bolt | 30W CO2 RF | 1000/2000 | 609×385 | Industrial-grade precision, stable power, smooth gradations, desktop portable, batch engraving, silent gantry movement |
| xTool S1 40W | 40W diode | 600 | 609×385 | Fully enclosed, Class-1 safety, fast engraving, automatic Z-height adjustment, rotary attachment, versatile material support |
| Atomstack A70 Max | 70W diode | 400 | 800×850 | Heavy-duty woodworking, suitable for cutting and engraving |
| Monoport 80W CO2 | 80W CO2 | 800 | 609×914 | Suitable for thicker wood cutting and engraving |
| Longer B1 40W | 40W diode | 600 | 450×440 | Precision engraving capabilities |
| Creality Falcon 2 | 40W diode | 416 | 400×450 | Budget-friendly option |
Note: The Thunder Laser Bolt balances speed and precision, making it ideal for intricate wood engraving projects and batch production.
Pros
- Delivers high precision and smooth gradations, even at fast speeds.
- Offers industrial-grade performance at a fraction of the cost of high-end models.
- Supports batch engraving and silent operation.
- Desktop portable design fits small workshops and home studios.
- Maintains engraving quality on a wide range of wood types and thicknesses.
Cons
- Higher initial investment than entry-level diode lasers.
- Larger footprint compared to compact engravers.
- May require ventilation setup for indoor use.
Real-World Use
The Thunder Laser Bolt adapts to a wide variety of wood engraving projects. Users create custom engraved gifts, intricate woodworking enhancements, and branded signage with ease. The machine excels at producing fine details on wood plaques, leather wallets, and even glassware using rotary attachments. Its stable power output and advanced motion system allow for rapid prototyping and product design, supporting both creative and commercial applications.
| Project Type / Tool Feature | Description / Capability |
|---|---|
| Custom Engraved Gifts | Engraves wood plaques, leather wallets, personalized glassware using rotary attachments. |
| Acrylic Signage & Displays | Cuts acrylic sheets for signage, branding, and display elements. |
| Woodworking Enhancements | Inlays, surface engraving, and custom joinery patterns on wood. |
| Metal Marking | Marks anodized aluminum and stainless steel using marking sprays. |
| Prototyping & Product Design | Rapid iteration of parts, enclosures, and functional prototypes. |

The Thunder Laser Bolt stands out as the best tool for those who demand both speed and detail. Competing models like the xTool S1 40W and Atomstack A70 Max offer strong performance, but they often compromise on either precision or versatility. The Epilog Fusion Pro 36 delivers exceptional results but comes at a much higher price, making it less accessible for most users. The Thunder Laser Bolt strikes the right balance, providing professional results without the premium price tag.
For creators, educators, and small business owners, the Thunder Laser Bolt unlocks new possibilities in wood engraving. Its blend of speed, accuracy, and reliability makes it the best tool for turning creative ideas into reality.
Why This Tool
Performance
The Thunder Laser Bolt delivers outstanding performance that sets it apart from other wood engraving machines. Its 30W CO2 RF laser produces crisp, detailed engravings with remarkable consistency. Users notice that the engraver maintains high precision even at fast speeds, which is essential for both intricate designs and batch production. Experts highlight several reasons for recommending this machine:
- High laser power and stable output ensure deep, clean engravings on a variety of wood types.
- Advanced motion systems and rigid frames support repeatable accuracy, even on uneven surfaces.
- Integrated software and automation features streamline the workflow, reducing manual adjustments.
The Thunder Laser Bolt competes with top-tier models by offering industrial-grade results without the complexity or cost of larger machines. Its precision rivals that of more expensive options, making it a smart choice for anyone who values quality and reliability.
Ease of Use
Ease of use remains a major advantage for the Thunder Laser Bolt. The machine features a user-friendly touchscreen interface, allowing users to import, edit, and position designs directly on the device. The on-screen grid helps with precise adjustments, while the ability to draw or type messages simplifies customization. Setup is quick, thanks to snap-in connectors and a clear manual. The interactive tutorial guides new users through the initial steps, including Wi-Fi connection and calibration.
Users benefit from:
- Adjustable height legs for larger items.
- Compact design that fits small workshops.
- Presets for different materials, reducing trial and error.
- Multiple file transfer options, including USB, Wi-Fi, and mobile app.
- Safety features such as a protective lid, tilt detection, and emergency stop button.
These ergonomic and intuitive features make the Thunder Laser Bolt accessible to beginners and efficient for professionals. The machine’s fast engraving speed also minimizes waiting time, increasing productivity for every project.
Versatility
Versatility defines the Thunder Laser Bolt as the best tool for wood engraving. It handles a wide range of wood types and project styles, adapting to the needs of hobbyists and small business owners. The following table highlights its capabilities:
| Wood Type | Material Characteristics | Suitable Project Types |
|---|---|---|
| Basswood | Soft, lightweight, fine uniform grain, low resin | Crafts, ornaments, photo tests, practice pieces, laser training |
| Birch Plywood | Medium hardness, layered, light cream surface | Signage, enclosures, puzzles, architectural models, DIY kits |
| Maple | Dense hardwood, tight grain, light uniform tone | Awards, plaques, cutting boards, branded merchandise, photo etching |
| Cherry | Medium-hard, reddish-brown, fine texture | Custom décor, wedding signage, personalized boxes, plaques |
| Alder | Soft texture, consistent color, minimal resin | Name tags, industrial parts, mass production engraving, photo art |
| Walnut | Dense hardwood, dark brown hues, rich grain | Executive gifts, furniture labels, artisanal signage, keepsakes |
The Thunder Laser Bolt supports everything from delicate crafts to high-volume production. Its ability to engrave on different wood densities and grains ensures that users can tackle diverse projects, including signage, awards, décor, and branded merchandise. This flexibility makes it a valuable investment for anyone seeking to expand their creative or business offerings.
Safety
Safety stands as a top priority for anyone working with wood engraving tools. The Thunder Laser Bolt incorporates advanced safety features that protect users during every project. Its protective lid shields eyes from harmful laser light, while tilt detection and an emergency stop button provide immediate response in case of accidents. These features help users focus on creativity without worrying about potential hazards.
Other leading engravers also set high standards for safety. The xTool S1, for example, is the first fully enclosed diode laser with a Class-1 safety certification. Its enclosure eliminates the need for extra eyewear and integrates automatic safety mechanisms. The Kentfaith mini laser engraver holds certifications such as CE, FC, FDA, and PSE. It includes a protective cover that filters laser light and shuts off automatically if the device moves or overheats. The VEVOR laser engraver meets CE, FCC, FDA, and IEC 60825 standards. It features an emergency stop switch and a UV filter that blocks 97% of harmful ultraviolet rays.
The Thunder Laser Bolt matches these industry leaders by offering a comprehensive suite of safety protections. Users can engrave wood, acrylic, and even glass with confidence. The machine’s design ensures that both beginners and professionals can operate it safely in home studios, classrooms, or small businesses.
Tip: Always check for safety certifications and protective features before choosing a wood engraving machine. Certified tools reduce risks and help maintain a safe workspace.
Value
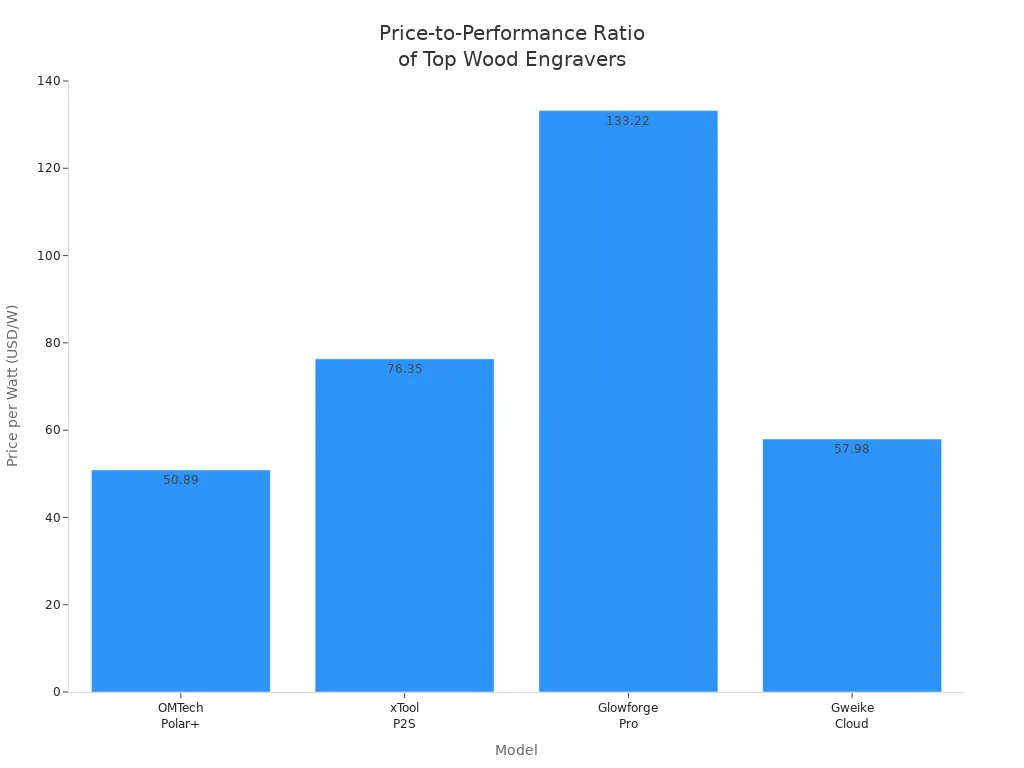
Value plays a crucial role when selecting the best tool for wood engraving. The Thunder Laser Bolt delivers a compelling price-to-performance ratio, making it a smart investment for hobbyists and small business owners. Users consistently praise its precision, reliability, and ease of use. Many describe it as a huge upgrade from previous models, noting that it outperforms even some premium competitors.
A comparison of leading wood engraving machines highlights the Thunder Laser Bolt’s strong value proposition. The OMTech Polar+ offers the best price-to-performance ratio, with a large work area, deep cutting capability, and professional software included. The xTool P2S and Glowforge Pro provide premium features but come at a much higher price. The Gweike Cloud stands out as a budget-friendly option with solid performance.
| Model | Price | Power | Work Area (mm) | Engraving Speed (mm/s) | Cutting Depth Wood (mm) | Included Accessories | Key Strengths |
|---|---|---|---|---|---|---|---|
| OMTech Polar+ | $2,799 | 55W | 500 × 300 | 500 | 18 | Two rotary attachments ($300+) | Best price-to-performance ratio; largest work area; deepest cutting depth; professional software included |
| xTool P2S | $4,199 | 55W | 430 × 250 | 600 | 15 | Dual 16MP HD cameras | Faster engraving speed; premium features; higher price |
| Glowforge Pro | $5,995 | 45W | Smaller | N/A | 12 | Proofgrade™ materials | Most expensive; lower power; user-friendly software |
| Gweike Cloud | $2,899 | 50W | 500 × 300 | Slightly lower speed | ~15 | Multiple connectivity options | Most affordable; solid performance; budget-friendly |
The Thunder Laser Bolt stands out as the best tool for those who want professional results without overspending. Its blend of performance, safety, and affordability makes it a top choice for anyone ready to elevate their wood engraving projects.
Tool Comparison
Laser Engravers
Laser engravers have transformed wood engraving, offering unmatched precision and flexibility. Two main types dominate the market: CO2 lasers and diode lasers. Each brings unique advantages and limitations, making it important to understand their differences before choosing the best tool for your needs.
CO2 Lasers
CO2 laser engravers stand out for their high precision and versatility. These machines use a longer wavelength (around 10.6 micrometers) and typically offer wattages from 20W to 60W for engraving, with higher wattages available for cutting. CO2 lasers excel at engraving non-metallic materials such as wood, acrylic, leather, and glass. They deliver crisp, detailed results with tolerances as tight as ±0.05 mm, making them ideal for intricate designs and professional projects.
| Aspect | CO2 Laser Engraver | Diode Laser Engraver |
|---|---|---|
| Wavelength | Longer (10.6 micrometers) | Shorter (0.8 to 1 micrometer) |
| Engraving Precision | High precision (±0.05 mm to ±0.1 mm) | Lower precision, less detailed engravings |
| Material Compatibility | Wood, plastic, acrylic, leather, coated metals | Wood, plastics, soft materials; limited on metals |
| Engraving Speed | Slower due to absorption | Generally faster but less powerful |
| Maintenance | More maintenance (tube, mirrors, lens) | Less maintenance, no consumables |
| Operating Cost | Higher | Lower |
| Engraving Quality | Higher quality and precision | Less powerful and less precise |
CO2 lasers require regular maintenance, including gas tube replacement and mirror alignment. Their operating costs run higher, but the engraving quality justifies the investment for those seeking professional results. Users who demand the best tool for detailed woodwork often choose CO2 laser engravers.
Diode Lasers
Diode laser engravers appeal to hobbyists and small business owners who want affordability and ease of use. These machines use a shorter wavelength (0.8 to 1 micrometer) and generally offer lower power than CO2 lasers. Diode lasers handle wood, plastics, and other soft materials well, but struggle with dense woods or metals.
Diode lasers engrave faster but with less power and precision. They require minimal maintenance and have lower operating costs, making them a practical choice for beginners or those with lighter workloads. While they cannot match the engraving quality of CO2 lasers, diode lasers provide a budget-friendly entry point for creative projects.
Tip: For users who prioritize speed and low maintenance, diode lasers offer a solid starting point. For those who value precision and versatility, CO2 lasers remain the gold standard.
Rotary Tools
Rotary tools, such as Dremel engravers, offer hands-on control for wood engraving. These tools use spinning bits to carve designs directly into the wood. Rotary tools excel in versatility, allowing users to switch between engraving, sanding, and polishing with ease. They work well for both flat and curved surfaces, making them suitable for custom crafts and repairs.
Experts note that rotary tools equipped with roller or chuck rotary attachments can further enhance project outcomes. Roller attachments provide versatility and quick changes for larger, uniform objects, while chuck attachments deliver superior precision for intricate, smaller, or irregular shapes. This combination allows users to select the right attachment for each project, balancing speed and detail.
| Aspect | Roller Rotary Attachment | Chuck Rotary Attachment |
|---|---|---|
| Precision | Less precise, may slip on irregular objects | High precision, secure grip for detailed work |
| Versatility | Handles a wide range of cylindrical objects | Best for smaller, intricate, or irregular items |
| Ease of Use | Easier setup, great for beginners | More complex, suited for experienced users |
| Cost | More affordable | More expensive, justified by precision |
| Suitable Projects | Tumblers, mugs, bottles | Rings, jewelry, pens, detailed items |
Rotary tools require a steady hand and some practice, but they reward users with creative freedom and tactile feedback. They suit artists and DIYers who want to experiment with textures and shapes.
Chisels
Chisels remain a classic choice for wood engraving, prized for their simplicity and control. The most common types include bevel-edged chisels, mortise chisels, firmer chisels, and butt chisels. Bevel-edged chisels offer the greatest versatility, adapting to a wide range of engraving and shaping tasks. Mortise chisels specialize in chopping mortises, while firmer chisels handle heavier work. Butt chisels excel at fine paring and detail work.
Gouges, such as flat, round, and bent gouges, expand the artist’s toolkit. Flat gouges create smooth surfaces, round gouges shape curves, and bent gouges reach tight spaces for intricate designs. V-parting tools add crisp lines and stylized patterns. Using a wooden mallet with chisels provides controlled force, especially on harder woods.
| Type of Tool | Description | Advantages |
|---|---|---|
| Flat Gouge | Removes small amounts of wood, creates flat surfaces | Precise control for flat areas |
| Round Gouge | Shapes curves, removes wood from concave areas | Ideal for shaping curves |
| Bent Gouge | Carves intricate designs, reaches tight spaces | Access to awkward angles |
| Chisel | Removes wood, creates flat surfaces | Versatile, essential for detail |
Maintaining a sharp edge is crucial for clean cuts and smooth finishes. Chisels reward patience and skill, making them a favorite for traditionalists and fine artists who want to create unique, handcrafted pieces.
Engraving Pens
Engraving pens offer a simple and affordable way to personalize wood projects. These handheld tools use a vibrating or rotating tip to etch designs directly onto the surface. Many crafters choose engraving pens for small projects, quick customizations, or when working with softer woods. The lightweight design allows for easy control, making them a popular choice for beginners and hobbyists.
Key Benefits of Engraving Pens:
- Portable and easy to store
- Low cost compared to laser engravers or rotary tools
- Minimal setup required
- Suitable for quick personalization
Engraving pens work best for marking names, dates, or simple patterns on wood. They excel at adding a personal touch to gifts, keepsakes, or small crafts. However, they do not match the precision or speed of laser engravers. The tip can wear down quickly, especially on harder woods, and the vibration may cause hand fatigue during longer sessions.
| Feature | Engraving Pens | Laser Engravers |
|---|---|---|
| Precision | Moderate | High |
| Learning Curve | Low | Medium to High |
| Project Size | Small to Medium | Small to Large |
| Cost | Low | Medium to High |
| Maintenance | Minimal | Moderate |
Tip: Engraving pens make a great entry point for anyone new to wood engraving. They help users practice control and technique before moving on to more advanced tools.
Crafters who want to experiment with designs or add quick details will find engraving pens a practical solution. For more intricate or professional results, upgrading to a rotary tool or laser engraver may be necessary.
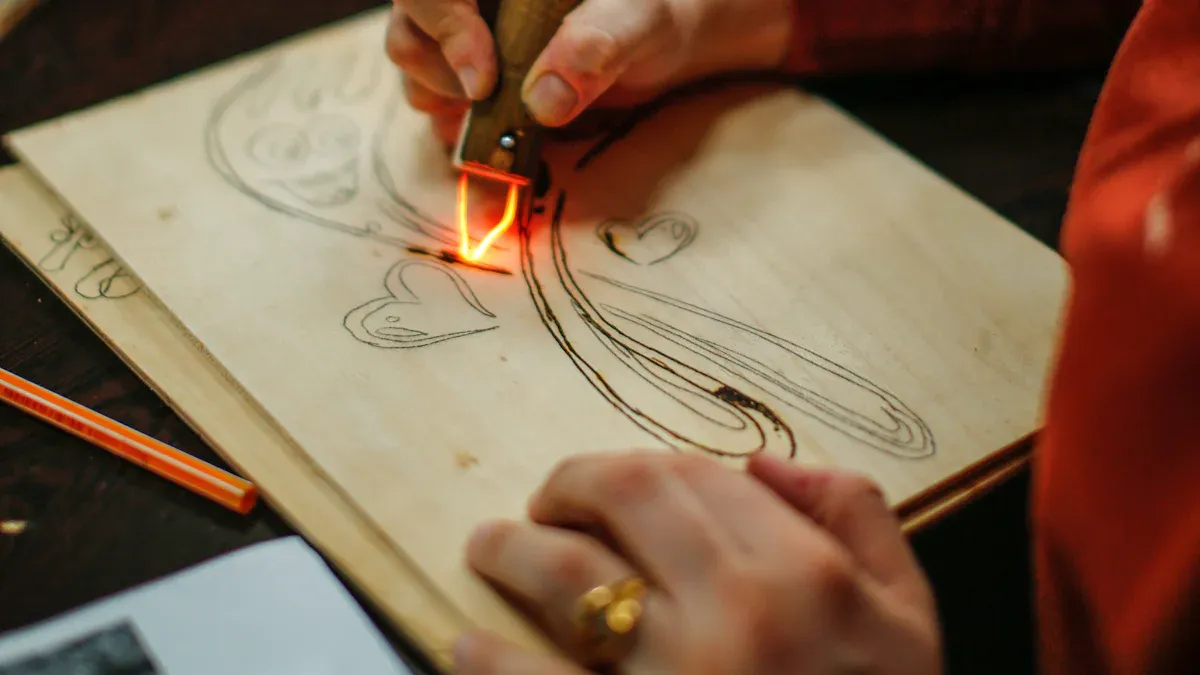
Wood Burning Tools
Wood burning tools, also known as pyrography pens, bring a unique artistic flair to wood engraving. These tools use heated metal tips to burn lines, patterns, and shading into the wood surface. Artists can control the depth and darkness of each mark by adjusting the heat and pressure, creating detailed images and gradients that stand out from other engraving methods.
Wood burning tools shine when used on soft, light-colored woods like basswood, cherry, or pine. The technique allows for precise line work and smooth shading, making it ideal for personalized crafts, folk art, and decorative projects. Many artists appreciate the tactile, hands-on experience and the distinct burnt wood texture and scent that pyrography provides.
Best Use Cases for Wood Burning Tools:
- Artistic decoration of plaques, boxes, and ornaments
- Personalized gifts with names, quotes, or illustrations
- Folk art and rustic home décor
- Projects that benefit from a handcrafted, natural look
Wire-nib burners offer advanced flexibility and precision, perfect for detailed work. Solid-point burners suit beginners who want to learn basic techniques. While laser engravers can replicate some effects, wood burning tools excel in projects where artistic shading and a handcrafted appearance matter most.
| Tool Type | Artistic Control | Texture & Scent | Learning Curve | Cost |
|---|---|---|---|---|
| Wood Burning Tool | High | Unique | Moderate | Low-Med |
| Laser Engraver | Moderate-High | None | High | High |
| Engraving Pen | Low-Moderate | None | Low | Low |
Note: Wood burning tools reward patience and creativity. They transform simple wood pieces into personalized works of art.
Anyone seeking a hands-on, creative approach to wood engraving should consider wood burning tools. The results feel personal and unique, making every project a one-of-a-kind masterpiece.
Choosing a Tool
Project Needs
Selecting the right wood engraving tool starts with understanding the project’s specific requirements. Every project has unique demands, and matching the tool to these needs ensures better results and a smoother experience. Consider these essential factors:
- Examine the resin content of the wood. High-resin woods like pine or fir create darker etches but may need more laser power. Low-resin woods such as cherry or maple produce lighter burns and require less power.
- Choose lighter-colored woods with a consistent grain. These woods reveal engraving details more clearly, while dark woods can hide fine lines.
- Look for wood with minimal streaking and a smooth surface. This choice helps maintain clarity, especially for detailed images or text.
- Match the wood species to the project. Softwoods like basswood are easy to engrave and suit beginners. Hardwoods such as maple and cherry offer durability and fine detail but may need higher-powered machines.
Project scale also matters. Small crafts or gifts work well with compact machines, while larger signage or batch production calls for engravers with bigger work areas and more power. Features like air assist and exhaust systems improve engraving quality by removing smoke and debris, making them valuable for complex or frequent projects.
Budget
Budget plays a major role in choosing the best tool for wood engraving. Entry-level diode lasers offer an affordable entry point for hobbyists and small projects. Higher-end CO2 lasers provide greater precision, faster speeds, and larger work areas for advanced or commercial use. The following table outlines typical price ranges:
| Type of Wood Engraving Machine | Typical Price Range (USD) |
|---|---|
| Mini Desktop Laser Wood Engravers | Starting at $2,400 |
| Small Hobby Laser Wood Etchers | $2,600 - $3,600 |
| Rotary Laser Wood-Burning Machines | Starting at $3,000 |
| Industrial Wood Laser Engraving Machines | Starting at $6,000 |
| 3D Wood Laser Engravers | $12,800 - $36,800 |

Higher-priced machines deliver more power, deeper engraving, and advanced features. Users often report that even entry-level models perform well for basic needs, but investing more brings better results, especially for demanding projects.
Safety
Safety should always come first when working with wood engraving tools. Users must keep tools sharp and well-maintained to prevent slips and injuries. Wearing protective gear such as cut-resistant gloves, safety goggles, and dust masks protects against wood particles and debris. A well-lit, stable, and clutter-free workspace reduces the risk of accidents.
For laser engravers, wearing laser safety glasses is crucial. Operating the machine in a well-ventilated area with fume extractors helps avoid inhaling harmful fumes. Users should always monitor the machine during operation and keep a fire extinguisher nearby. Built-in safety features like auto shut-off and emergency stop buttons add another layer of protection.
Tip: Never overlook safety features or proper setup. The right precautions protect both the user and the investment in the best tool for wood engraving.
Features
Selecting the right wood engraving tool depends on understanding the features that drive performance and comfort. Buyers should focus on quality, ergonomics, and essential accessories. The following table highlights the most important features to consider:
| Key Feature | Description |
|---|---|
| Steel Quality | High carbon steel holds a sharp edge longer. Proper heat treatment (around 60-62 HRC) increases hardness and durability. Consistent grain structure makes sharpening easier and extends tool life. |
| Handle Design | Ergonomic handles fit comfortably in the hand. Good design reduces fatigue and improves control during long engraving sessions. |
| Edge Geometry | Well-shaped edges match specific carving tasks. Precision edges allow for clean cuts and detailed work. |
| Tool Selection | Beginners should start with basic tools like whittling knives and gouges. Focusing on a few essentials helps users master technique before expanding their collection. |
| Accessories | Sharpening systems keep tools in top condition. Safety equipment protects hands and eyes, making every project safer and more enjoyable. |
A high-quality steel blade ensures the tool stays sharp and reliable. Users who invest in proper heat-treated steel experience fewer interruptions and smoother carving. Ergonomic handles make a noticeable difference, especially during extended use. Comfortable grips help users maintain steady control and avoid hand strain.
Edge geometry matters for every project. A properly shaped edge matches the task, whether carving fine details or removing larger sections of wood. Precision edges lead to cleaner results and less frustration. Beginners often benefit from starting with a small set of essential tools. Mastering whittling knives and gouges builds confidence and skill. Expanding the toolkit later allows for more advanced techniques.
Accessories play a vital role in maintaining tool performance and user safety. Sharpening systems keep blades ready for action. Safety gear, such as gloves and goggles, protects users from accidents. Investing in these extras ensures a smoother and safer engraving experience.
Tip: Buyers should prioritize steel quality and handle comfort. These features deliver lasting value and make every project more enjoyable.
Choosing tools with the right features sets the foundation for successful wood engraving. Users who focus on quality, comfort, and essential accessories achieve better results and enjoy the creative process.
Tips for Engraving
Preparing Wood
Proper wood preparation sets the foundation for flawless engraving results. Every successful project begins with a smooth, clean surface. Sanding the wood removes rough spots and creates an even base, which helps the engraving tool glide effortlessly. After sanding, cleaning the surface eliminates dust and debris that could interfere with the engraving process.
Applying masking tape to the wood can prevent burn marks, splinters, and uneven edges. This simple step keeps the final product looking sharp and professional. Choosing the right wood type also matters. Baltic birch and basswood stand out for their smooth grains and low resin content, producing cleaner and more detailed engravings.
Before starting the main project, running test engravings on scrap wood allows users to fine-tune laser power, speed, and resolution settings. This practice ensures the best results for each specific wood type and thickness. Using air assist and cooling methods reduces smoke buildup and scorching, further enhancing the engraving quality.
Best Practices for Preparing Wood:
- Sand the wood surface for smoothness.
- Clean thoroughly to remove dust.
- Apply masking tape to protect edges.
- Select woods like Baltic birch or basswood.
- Run test engravings on scrap pieces.
- Use air assist to minimize smoke and scorching.
Tip: Investing time in preparation pays off with crisp, professional engravings every time.
Tool Setup
Setting up the engraving tool correctly ensures safety and optimal performance. Users should start by unboxing the machine and placing it on a stable, flat surface in a well-ventilated area, away from flammable materials. Connecting the machine to power and a computer comes next, followed by installing the required software and drivers.
Turning on the machine and adjusting the laser focus to the correct distance from the material is crucial. Configuring the software with the right machine profile and material parameters guarantees accurate results. Ensuring the exhaust system works and wearing protective eyewear keeps the workspace safe.
Loading the design into the software, confirming material settings, and monitoring the engraving process completes the setup. These steps help users avoid mistakes and achieve consistent, high-quality results.
Tool Setup Checklist:
- Place the machine on a stable, ventilated surface.
- Connect to power and computer; install software.
- Adjust laser focus for the material.
- Configure software and material settings.
- Check exhaust system and wear safety gear.
- Load design and monitor the engraving.
Techniques
Mastering engraving techniques elevates every project. Experimenting with laser settings—such as speed, power, focus, and resolution—unlocks intricate designs and complex patterns. Preparing the wood by cleaning, drying, sanding, staining, and sealing enhances both quality and durability.
Using high-quality design software like Adobe Illustrator or CorelDRAW allows users to create detailed, scalable vector files. Selecting woods with fine, consistent grain—such as maple, alder, cherry, or birch—ensures high contrast and sharp detail. Regular maintenance of the engraver, including cleaning lenses and mirrors, preserves precision and efficiency.
| Technique or Material | Description |
|---|---|
| Adjustable laser power and resolution | Enables detailed grayscale images and intricate designs. |
| Air assist systems | Reduce charring and remove debris for cleaner results. |
| Maple, basswood, birch, cherry, walnut | Offer fine grain and excellent contrast for detailed engraving. |
Note: Consistent practice and attention to detail transform ordinary projects into works of art.
Maintenance
Regular maintenance keeps wood engraving tools performing at their best. Every user who invests in a quality engraver wants reliable results and a long-lasting machine. Neglecting routine care leads to costly repairs and inconsistent engravings. The Thunder Laser Bolt and similar machines reward users who follow a simple maintenance schedule.
Essential Maintenance Tasks for Laser Engravers:
-
After Each Use
- Power down the laser before closing the software. This habit extends the system’s lifespan.
- Wipe the monitor, workbench, and keyboard with a cloth dampened in alcohol or cleaner. Avoid pouring liquids directly onto surfaces.
- Remove debris from the crumb tray. Discard residue to prevent buildup and fire hazards.
-
Daily Care
- Lubricate rails and bearings. Smooth movement ensures precise engraving and reduces wear.
- Check laser beam alignment and focus. Proper calibration delivers sharp, detailed results.
- Test all switches, including the main power and marking system. Reliable controls prevent unexpected shutdowns.
-
Weekly Upkeep
- Clean mirrors and lenses with a cotton swab and optics cleaner. Dust and debris reduce laser power and accuracy.
- Confirm normal laser output. Consistent light guarantees professional results.
- Use manual marking mode to verify laser accuracy. Adjust parameters if needed.
-
Monthly Checks
- Clean exhaust ports and ductwork. Good ventilation prevents overheating and maintains air quality.
- Brush vents and draft ports with a flexible tool. Clear airflow supports safe operation.
- When the machine sits idle, cut power and cover lenses. Protection from dust extends lens life.
- Inspect guide rails for looseness or oil leaks. Lubricate as needed to avoid breakdowns.
- Clean the impeller if no fume filter exists. This step keeps the workspace safe.
- Examine laser connections. Clean and secure them to prevent damage.
| Maintenance Task | Frequency | Benefit |
|---|---|---|
| Power down properly | After use | Extends system lifespan |
| Clean surfaces | After use | Prevents residue buildup |
| Lubricate moving parts | Daily | Ensures smooth operation |
| Align laser beam | Daily | Maintains engraving precision |
| Clean optics | Weekly | Preserves laser power |
| Ventilation cleaning | Monthly | Prevents overheating |
| Inspect connections | Monthly | Avoids costly repairs |
Tip: Consistent maintenance saves money and time. Users who care for their tools enjoy flawless engravings and fewer interruptions.
Every engraver owner benefits from a regular routine. Clean machines deliver crisp lines and deep cuts. Well-lubricated parts move smoothly, reducing frustration and downtime. Proper ventilation and clean optics protect both the user and the equipment. Those who prioritize maintenance see their investment pay off with every project.
The Thunder Laser Bolt stands out as the best tool for wood engraving because it delivers unmatched precision, speed, and versatility. Users praise its ability to cut thick woods, engrave tiny text, and handle a wide range of materials.
- Superior cutting on thick and hard woods
- Clean, high-contrast engravings with minimal smoke
- Precise laser dot for detailed work
- Rotary attachment compatibility for cylindrical objects
- Expandable work area and upgrade options
- Broad software compatibility for flexible design
Experts recommend buyers match machine power and safety features to their needs. The table below highlights key advice for a confident purchase:
| Aspect | Expert Advice Summary |
|---|---|
| Material Compatibility | Choose a CO2 laser for wood projects. |
| Power Requirements | Select power for project speed and complexity. |
| Budget | Set your budget early to narrow choices. |
| Safety Features | Prioritize emergency stops and protective covers. |
| Size and Space | Ensure the machine fits your workspace. |
| Software Compatibility | Confirm support for user-friendly software. |
| Maintenance & Support | Consider ease of maintenance and after-sales support. |
| Skill Level | Match complexity to your experience. |
| Brand & Service | Favor reputable brands with strong customer service. |
| Common Mistakes | Avoid neglecting safety and underestimating the learning curve. |
Anyone seeking professional results should consider their project needs and workspace. The Thunder Laser Bolt offers the performance and flexibility to help users succeed.
FAQ
What wood types work best for laser engraving?
Light-colored woods with fine, even grain—such as basswood, maple, and birch—produce the sharpest engravings. These woods reveal details clearly and minimize burn marks. Users who choose these materials achieve professional results with less effort.
How safe is the Thunder Laser Bolt for beginners?
The Thunder Laser Bolt includes a protective lid, emergency stop, and tilt detection. These features help prevent accidents. Beginners can operate the machine confidently by following safety guidelines and using the built-in protections.
Can the Thunder Laser Bolt engrave materials besides wood?
Yes! The Thunder Laser Bolt engraves acrylic, leather, glass (with rotary attachment), and coated metals. This versatility allows users to expand their creative projects and offer more products to customers.
How often should users maintain their laser engraver?
Regular maintenance ensures top performance. Users should clean surfaces and remove debris after each use, lubricate moving parts daily, and check optics weekly. Monthly checks of ventilation and connections keep the machine running smoothly.
What software works with the Thunder Laser Bolt?
The Thunder Laser Bolt supports popular design software like LightBurn, CorelDRAW, and Adobe Illustrator. Users can import files in multiple formats, making the design process flexible and efficient.
Is a rotary attachment necessary for wood engraving?
A rotary attachment is not required for flat wood pieces. However, it becomes essential for engraving cylindrical objects like tumblers or glassware. Users who want to expand their product range should consider this upgrade.
How does the Thunder Laser Bolt compare to diode lasers?
The Thunder Laser Bolt delivers higher precision, deeper engraving, and faster speeds than most diode lasers. Users who want professional results and versatility will find the Thunder Laser Bolt a superior investment.
What safety gear should users wear when engraving wood?
Users should wear safety goggles, cut-resistant gloves, and a dust mask. Proper gear protects against debris and fumes. Safety always comes first for every project.


